
How to set up the Meta Pixel on your online store with HitPay
25 Mei 2023
Learn how the Meta Pixel can help you improve conversions on your website.
In this article, learn how to use the Meta Pixel integration to grow your online business. If you're ready to set up now on your HitPay Online Store, check out this step-by-step guide.
Picture this: You’re on Instagram browsing a coat sale catalogue you’ve been eyeing for a winter trip.
But a crash interrupts you. It's time to clean up after your cat knocked over a vase. Distracted, you close your browser, buying nothing.
Hours later, while browsing your Instagram feed, you see an ad run by the same brand featuring the coat you had your eye on. It reminds you of the sale you wanted to take advantage of. Delighted, you complete your purchase and wait for your coat to arrive on your doorstep.
That’s called remarketing, and it’s all made possible with digital marketing tools like the Meta Pixel. When used correctly, you can help re-connect your customers who’ve already shown interest in your brand to the products they’re looking for.
About the Meta Pixel
Formerly called the Facebook Pixel, Meta Pixel is a piece of code for your website that lets you measure, optimise and build audiences for your ad campaigns.
It’s handy to tap on Meta’s massive advertising reach across Facebook, Instagram and WhatsApp to reach new audiences. After all, Meta's core products are used by 3.74 billion people worldwide every month.
New to Facebook or Instagram advertising? Set up Meta Pixel quickly and easily with HitPay's free integration.
Why use the HitPay Online Store with the Meta tracking pixel?
Once installed, the Meta tracking pixel helps you understand what people do on your online store. You’ll know which products visitors are interested in and the actions they take on your website (e.g. which buttons they click).
With the data from Meta Pixel, you can run targeted ad campaigns to:
Engage with the people who have shown interest in your products
Create a similar audience to your website visitors to find new customers
Run retargeting campaigns to drive sales and brand awareness
Think of it as a walking billboard for your products, reaching the people most likely to buy as they’ve previously shown interest.
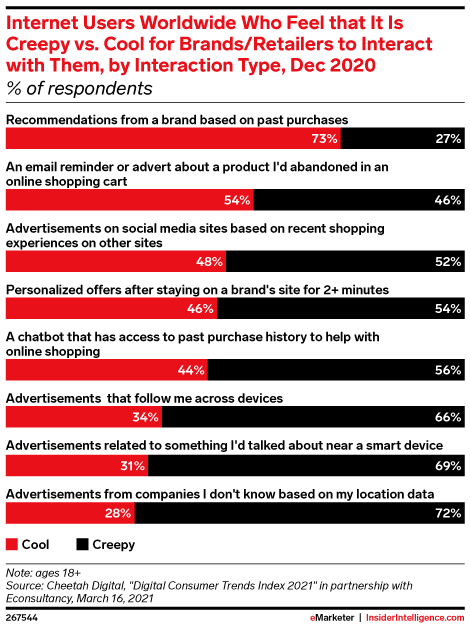
You want to use remarketing ads sparingly, though. Data from EConsultancy shows people were most responsive to remarketing ads if it was a recommendation from a brand based on past purchases or a reminder of a product abandoned in an online shopping cart.
Source: Insider Intelligence
How setting up the Meta Pixel can help your HitPay online store sell more:
Bring back lost or inactive customers:
Average e-commerce conversion rates stand at 3%, meaning out of 100 visitors, only three will buy from you. Remarketing campaigns remind visitors to check out products they are interested in.
Create ads that feature the product your visitors were interested in with an incentive like a discount or a time-sensitive deal.
Increase sales by upselling current customers
Meta allows you to re-target ads based on purchase history, leading existing customers back to your store for another purchase.

For example, this ad from the furniture e-commerce store Castlery showed up while browsing Facebook after a recent purchase on their e-commerce store.
Expand your customer base:
You can use Meta Pixel data to create a Facebook Lookalike audience that targets people with similar interests, likes, and demographics. This can be a great way to target people who have bought from your competitors.
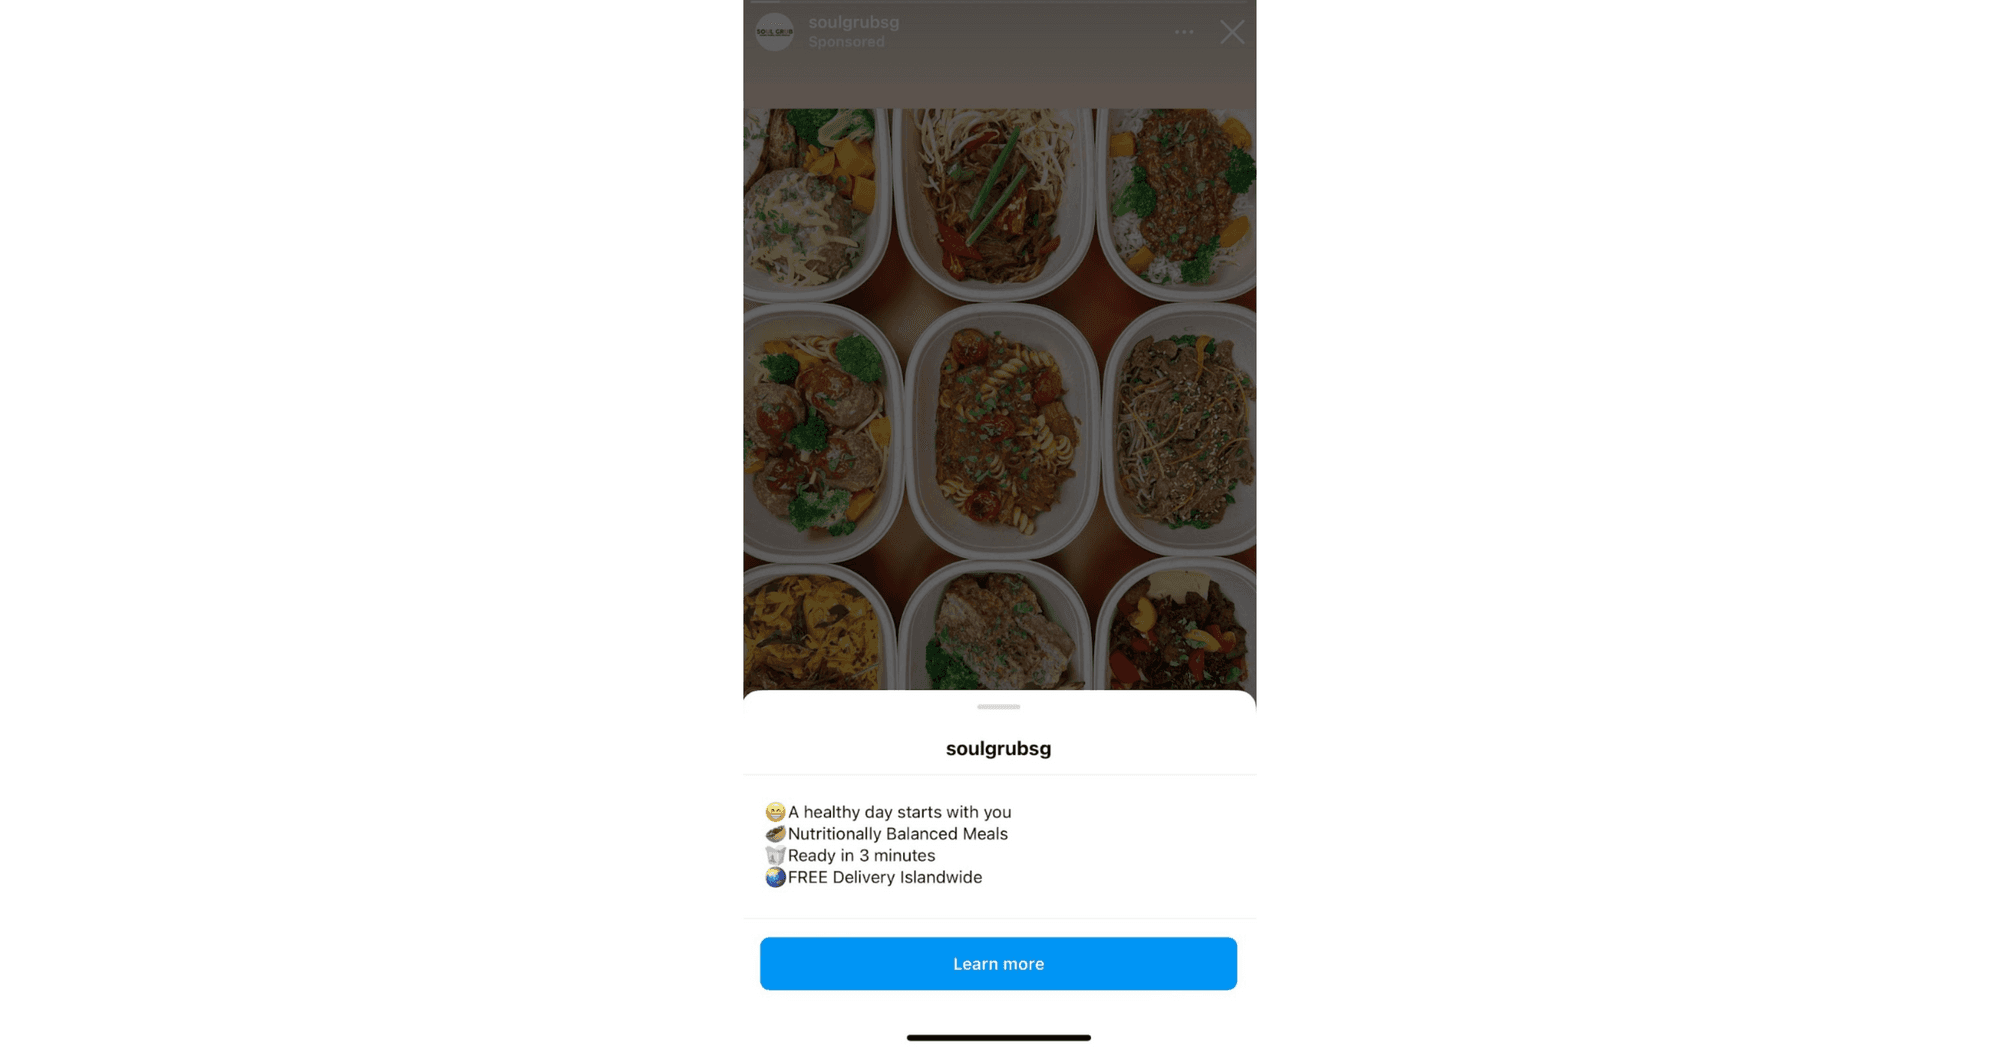
For example, here’s an example from the food delivery company Soul Grub on Instagram after browsing other similar food delivery websites.
3 simple steps to set up the Meta Pixel on your HitPay Online Store
Get your Meta Pixel ID from your Meta ads account
Add the Meta Pixel ID to your HitPay online store
Test it to ensure it works properly
Follow these step-by-step instructions to set up your Meta Pixel on HitPay in minutes. Got questions? Contact our support team here.
Anda mungkin juga menyukai pos-pos ini

Digital Product Ideas You Can Sell Online: A Complete Guide
HitPay Philippines
HitPay Online Store
11 September 2024
What Is a Digital Product? How to Start Selling Profitable Digital Products Through Online Stores
HitPay Philippines
HitPay Online Store
10 September 2024
The Benefits of Selling Digital Products: How to Create a Profitable Digital Product
HitPay Philippines
HitPay Online Store
10 September 2024
How to set up the Meta Pixel on your online store with HitPay
25 Mei 2023
Learn how the Meta Pixel can help you improve conversions on your website.

In this article, learn how to use the Meta Pixel integration to grow your online business. If you're ready to set up now on your HitPay Online Store, check out this step-by-step guide.
Picture this: You’re on Instagram browsing a coat sale catalogue you’ve been eyeing for a winter trip.
But a crash interrupts you. It's time to clean up after your cat knocked over a vase. Distracted, you close your browser, buying nothing.
Hours later, while browsing your Instagram feed, you see an ad run by the same brand featuring the coat you had your eye on. It reminds you of the sale you wanted to take advantage of. Delighted, you complete your purchase and wait for your coat to arrive on your doorstep.
That’s called remarketing, and it’s all made possible with digital marketing tools like the Meta Pixel. When used correctly, you can help re-connect your customers who’ve already shown interest in your brand to the products they’re looking for.
About the Meta Pixel
Formerly called the Facebook Pixel, Meta Pixel is a piece of code for your website that lets you measure, optimise and build audiences for your ad campaigns.
It’s handy to tap on Meta’s massive advertising reach across Facebook, Instagram and WhatsApp to reach new audiences. After all, Meta's core products are used by 3.74 billion people worldwide every month.
New to Facebook or Instagram advertising? Set up Meta Pixel quickly and easily with HitPay's free integration.
Why use the HitPay Online Store with the Meta tracking pixel?
Once installed, the Meta tracking pixel helps you understand what people do on your online store. You’ll know which products visitors are interested in and the actions they take on your website (e.g. which buttons they click).
With the data from Meta Pixel, you can run targeted ad campaigns to:
Engage with the people who have shown interest in your products
Create a similar audience to your website visitors to find new customers
Run retargeting campaigns to drive sales and brand awareness
Think of it as a walking billboard for your products, reaching the people most likely to buy as they’ve previously shown interest.
You want to use remarketing ads sparingly, though. Data from EConsultancy shows people were most responsive to remarketing ads if it was a recommendation from a brand based on past purchases or a reminder of a product abandoned in an online shopping cart.

Source: Insider Intelligence
How setting up the Meta Pixel can help your HitPay online store sell more:
Bring back lost or inactive customers:
Average e-commerce conversion rates stand at 3%, meaning out of 100 visitors, only three will buy from you. Remarketing campaigns remind visitors to check out products they are interested in.
Create ads that feature the product your visitors were interested in with an incentive like a discount or a time-sensitive deal.
Increase sales by upselling current customers
Meta allows you to re-target ads based on purchase history, leading existing customers back to your store for another purchase.

For example, this ad from the furniture e-commerce store Castlery showed up while browsing Facebook after a recent purchase on their e-commerce store.
Expand your customer base:
You can use Meta Pixel data to create a Facebook Lookalike audience that targets people with similar interests, likes, and demographics. This can be a great way to target people who have bought from your competitors.
For example, here’s an example from the food delivery company Soul Grub on Instagram after browsing other similar food delivery websites.

3 simple steps to set up the Meta Pixel on your HitPay Online Store
Get your Meta Pixel ID from your Meta ads account
Add the Meta Pixel ID to your HitPay online store
Test it to ensure it works properly
Follow these step-by-step instructions to set up your Meta Pixel on HitPay in minutes. Got questions? Contact our support team here.
Anda mungkin juga menyukai pos-pos ini

Digital Product Ideas You Can Sell Online: A Complete Guide
HitPay Philippines
HitPay Online Store
11 September 2024

What Is a Digital Product? How to Start Selling Profitable Digital Products Through Online Stores
HitPay Philippines
HitPay Online Store
10 September 2024

The Benefits of Selling Digital Products: How to Create a Profitable Digital Product
HitPay Philippines
HitPay Online Store
10 September 2024
How to set up the Meta Pixel on your online store with HitPay
25 Mei 2023
Learn how the Meta Pixel can help you improve conversions on your website.

In this article, learn how to use the Meta Pixel integration to grow your online business. If you're ready to set up now on your HitPay Online Store, check out this step-by-step guide.
Picture this: You’re on Instagram browsing a coat sale catalogue you’ve been eyeing for a winter trip.
But a crash interrupts you. It's time to clean up after your cat knocked over a vase. Distracted, you close your browser, buying nothing.
Hours later, while browsing your Instagram feed, you see an ad run by the same brand featuring the coat you had your eye on. It reminds you of the sale you wanted to take advantage of. Delighted, you complete your purchase and wait for your coat to arrive on your doorstep.
That’s called remarketing, and it’s all made possible with digital marketing tools like the Meta Pixel. When used correctly, you can help re-connect your customers who’ve already shown interest in your brand to the products they’re looking for.
About the Meta Pixel
Formerly called the Facebook Pixel, Meta Pixel is a piece of code for your website that lets you measure, optimise and build audiences for your ad campaigns.
It’s handy to tap on Meta’s massive advertising reach across Facebook, Instagram and WhatsApp to reach new audiences. After all, Meta's core products are used by 3.74 billion people worldwide every month.
New to Facebook or Instagram advertising? Set up Meta Pixel quickly and easily with HitPay's free integration.
Why use the HitPay Online Store with the Meta tracking pixel?
Once installed, the Meta tracking pixel helps you understand what people do on your online store. You’ll know which products visitors are interested in and the actions they take on your website (e.g. which buttons they click).
With the data from Meta Pixel, you can run targeted ad campaigns to:
Engage with the people who have shown interest in your products
Create a similar audience to your website visitors to find new customers
Run retargeting campaigns to drive sales and brand awareness
Think of it as a walking billboard for your products, reaching the people most likely to buy as they’ve previously shown interest.
You want to use remarketing ads sparingly, though. Data from EConsultancy shows people were most responsive to remarketing ads if it was a recommendation from a brand based on past purchases or a reminder of a product abandoned in an online shopping cart.

Source: Insider Intelligence
How setting up the Meta Pixel can help your HitPay online store sell more:
Bring back lost or inactive customers:
Average e-commerce conversion rates stand at 3%, meaning out of 100 visitors, only three will buy from you. Remarketing campaigns remind visitors to check out products they are interested in.
Create ads that feature the product your visitors were interested in with an incentive like a discount or a time-sensitive deal.
Increase sales by upselling current customers
Meta allows you to re-target ads based on purchase history, leading existing customers back to your store for another purchase.

For example, this ad from the furniture e-commerce store Castlery showed up while browsing Facebook after a recent purchase on their e-commerce store.
Expand your customer base:
You can use Meta Pixel data to create a Facebook Lookalike audience that targets people with similar interests, likes, and demographics. This can be a great way to target people who have bought from your competitors.
For example, here’s an example from the food delivery company Soul Grub on Instagram after browsing other similar food delivery websites.

3 simple steps to set up the Meta Pixel on your HitPay Online Store
Get your Meta Pixel ID from your Meta ads account
Add the Meta Pixel ID to your HitPay online store
Test it to ensure it works properly
Follow these step-by-step instructions to set up your Meta Pixel on HitPay in minutes. Got questions? Contact our support team here.
Anda mungkin juga menyukai pos-pos ini

Digital Product Ideas You Can Sell Online: A Complete Guide
HitPay Philippines
HitPay Online Store
11 September 2024

What Is a Digital Product? How to Start Selling Profitable Digital Products Through Online Stores
HitPay Philippines
HitPay Online Store
10 September 2024

The Benefits of Selling Digital Products: How to Create a Profitable Digital Product
HitPay Philippines
HitPay Online Store
10 September 2024

Let's get you set up
Create an account instantly or contact us to create a custom package for your business.

perangkat lunak bisnis
Perusahaan
Singapura
Filipina
Malaysia
Indonesia
Thailand
Australia & Selandia Baru
Semua negara lain
HitPay Payment Solutions Pte Ltd ("HitPay") memiliki lisensi sebagai Institusi Pembayaran Utama (PS20200643) di bawah Undang-Undang Layanan Pembayaran Singapura untuk penyediaan Layanan Transfer Uang Domestik, Layanan Transfer Uang Lintas Batas, dan Layanan Akuisisi Merchant. Ini dapat dikonfirmasi di Direktori Institusi Keuangan MAS di sini. HitPay juga dapat menyediakan layanan ini bersama dengan mitra lain yang memiliki lisensi atau pengecualian dari MAS.
HitPay Payment Solutions Pte Ltd
1 Keong Saik Road, Singapura 089109

Let's get you set up
Create an account instantly or contact us to create a custom package for your business.

perangkat lunak bisnis
Perusahaan
Singapura
Filipina
Malaysia
Indonesia
Thailand
Australia & Selandia Baru
Semua negara lain
HitPay Payment Solutions Pte Ltd ("HitPay") memiliki lisensi sebagai Institusi Pembayaran Utama (PS20200643) di bawah Undang-Undang Layanan Pembayaran Singapura untuk penyediaan Layanan Transfer Uang Domestik, Layanan Transfer Uang Lintas Batas, dan Layanan Akuisisi Merchant. Ini dapat dikonfirmasi di Direktori Institusi Keuangan MAS di sini. HitPay juga dapat menyediakan layanan ini bersama dengan mitra lain yang memiliki lisensi atau pengecualian dari MAS.
HitPay Payment Solutions Pte Ltd
1 Keong Saik Road, Singapura 089109

Let's get you set up
Create an account instantly or contact us to create a custom package for your business.

perangkat lunak bisnis
Perusahaan
Singapura
Filipina
Malaysia
Indonesia
Thailand
Australia & Selandia Baru
Semua negara lain
HitPay Payment Solutions Pte Ltd ("HitPay") memiliki lisensi sebagai Institusi Pembayaran Utama (PS20200643) di bawah Undang-Undang Layanan Pembayaran Singapura untuk penyediaan Layanan Transfer Uang Domestik, Layanan Transfer Uang Lintas Batas, dan Layanan Akuisisi Merchant. Ini dapat dikonfirmasi di Direktori Institusi Keuangan MAS di sini. HitPay juga dapat menyediakan layanan ini bersama dengan mitra lain yang memiliki lisensi atau pengecualian dari MAS.
HitPay Payment Solutions Pte Ltd
1 Keong Saik Road, Singapura 089109

Let's get you set up
Create an account instantly or contact us to create a custom package for your business.

perangkat lunak bisnis
Perusahaan
Singapura
Filipina
Malaysia
Indonesia
Thailand
Australia & Selandia Baru
Semua negara lain
HitPay Payment Solutions Pte Ltd ("HitPay") memiliki lisensi sebagai Institusi Pembayaran Utama (PS20200643) di bawah Undang-Undang Layanan Pembayaran Singapura untuk penyediaan Layanan Transfer Uang Domestik, Layanan Transfer Uang Lintas Batas, dan Layanan Akuisisi Pedagang. Ini dapat dikonfirmasi di Direktori Institusi Keuangan MAS di sini. HitPay juga dapat menyediakan layanan ini bersama dengan mitra lain yang dilisensikan oleh MAS atau yang dibebaskan.
HitPay Payment Solutions Pte Ltd
1 Keong Saik Road, Singapura 089109